This Sunder Earthshatter build turns the shared Gemling Legionnaire core from Part 1 into a Slam-based Mace setup that pushes Aftershock chance past 100%. If you haven’t built the shared foundation yet, start with Part 1 — the All-in-One Build Guide.
📌 1. Sunder + Earthshatter Build Overview & Mechanics
1. Sunder + Earthshatter, Aftershock over 100%
-
 Sunder
is the mapping half of this Sunder Earthshatter combo — it slams a fissure forward in a sequence of waves, and enemies caught by a wave release a shockwave that damages everyone else nearby. Advanced Thaumaturgy’s Quality bonus for Sunder is pure Attack Speed, which is why this build’s Sunder swings noticeably faster than a plain copy of the gem would.
-
 Earthshatter
is the bossing half — it drives a fissure forward and thrusts up a spike that lingers for 6 seconds. Normally a Warcry near the spike is what shatters it for a separate Explosion hit, but this build skips that step entirely. Stack Earthshatter’s own Quality bonus (chance for an additional Aftershock), the Aftershock II support gem, and a crafted Aftershock-chance roll on the mace itself, and total Aftershock chance clears 100% — every spike that comes up detonates on its own the instant it lands, no Warcry needed to set it off.
2. Defense: Giant’s Blood + Shield
- Same trade-off as the Molten Blast Mace variant: this build allocates Giant’s Blood to wield the Two-Handed Mace in one hand and carry a Shield in the other, giving up a bit of raw weapon damage for a real Block layer.
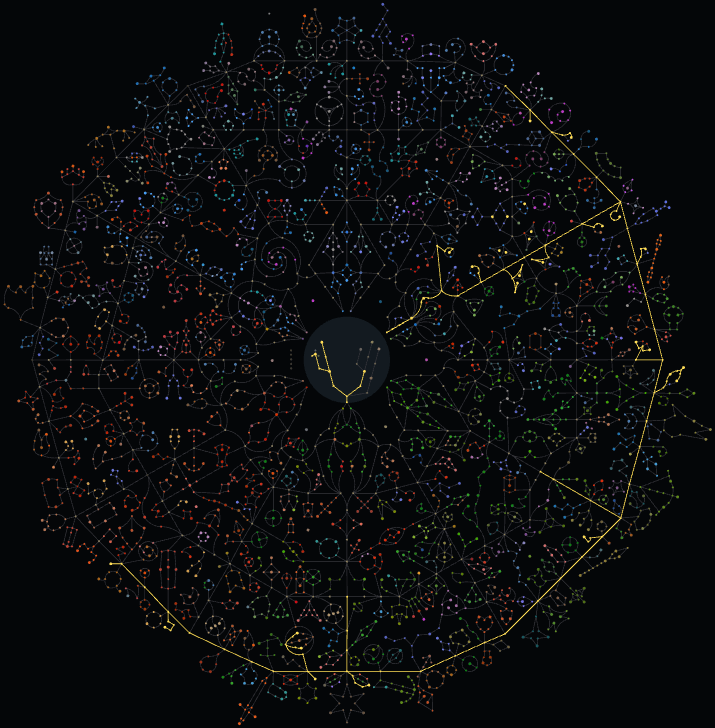
3. Passive tree: less Warcry, more Area
- Since this build never manually casts a Warcry — Aftershock chance over 100% handles the spike detonation on its own — the Warcry-related nodes taken on other variants aren’t worth investing in here. Those points get refunded and reinvested into Area of Effect and Area Damage nodes instead, maximizing mapping speed and hit-feel — both Sunder’s wave/shockwave chain and Earthshatter’s fissure/explosion scale directly off that.
4. Hunting routine
- Same shared routine as every other variant: build Power Charges by killing with Sunder or Earthshatter, then pop Pinnacle of Power off the secondary weapon set for a short window of massively amplified damage before going back to normal hunting.
📊 2. Pros & Cons
Pros:
- Aftershock chance clears 100% between Earthshatter’s Quality roll, the crafted weapon affix, and the Aftershock II support — every spike detonates on its own the instant it lands, no Warcry needed.
- Surprisingly fast clear for a Slam-based kit, thanks to Sunder’s wave-into-shockwave chain covering a wide arc in front of you.
- Sunder’s Sundered Armour debuff plays nicely with the shared Power Charge / Pinnacle of Power routine, so the same setup handles packs and bosses without switching skills.
Cons:
- Giant’s Blood + Shield trades away some raw two-handed weapon damage for the extra Block layer — same trade-off as the Molten Blast Mace variant.
- All three Aftershock-chance sources — Earthshatter’s Quality roll, the Aftershock II support, and the crafted weapon affix — need to be in place to actually clear 100%; until then, some spikes won’t self-detonate and Earthshatter’s payoff feels inconsistent.
Want the ranged version of this Mace setup instead? Check out Part 2 — Molten Blast + Ancestral Cry.
🎒 3. Gear & Gem Setup
Everything here — passives, ascendancy, and the Shared Jewels — is identical to the core build in Part 1. Only the weapon, gloves, and amulet change for this Sunder Earthshatter variant.
Gear by Slot (changes from Part 1):
- Weapon: Two-Handed Mace, wielded one-handed via the Giant’s Blood keystone — same base setup as the Molten Blast Mace variant. Craft a chance to cause an additional Aftershock directly onto the mace, on top of the Saqawal’s Rune of the Sky needed for the shared weapon-swap trick.
- Gloves: swap to the Melee-skill-level pair — same jewel socket carrying the shared combat jewel as every other variant, with “+2 to Level of all Melee Skills” in place of the Projectile line.
- Amulet: same fractured recipe as Part 1 (Spirit locked into one prefix, Max Runic Ward as the other, Quality of all Skills as a fixed line), just with “+4 to Level of all Melee Skills” instead of Projectile.
🔮 4. Full Skill List
The complete skill and support gem setup for this Sunder Earthshatter build.
-
Sunder
Sunder
Attack
Slam the ground, creating a roiling fissure that damages enemies in a sequence of areas in front of you. A number of enemies hit by the wave will release a shockwave, damaging other enemies. Hitting an enemy with Fully Broken Armour applies Sundered Armour, making it take additional increased Physical damage.
Wave+0.2 metres to wave length for each wave in the Sequence
While Dual Wielding, both weapons hit with 30% less damage
Wave length is 0.9 metres
Wave causes shockwaves from up to 7 enemies in each area
Inflicts Sundered Armour on hitting Fully Armour Broken targets, causing 20% additional increased Physical damage taken
Sundered Armour has 6 second duration, or until Fully Broken Armour is removed
Additional Effects From Quality:(0–50)% reduced Accuracy penalty based on distance
(0–20)% more Attack SpeedShockwave—Attack Damage: (65–265)%
While Dual Wielding, both weapons hit with 30% less damage
Shockwave radius is 1.2 metres
 Rapid Attacks II,
 Verglas,
 Branching Fissures II,
 Vorana’s Siege
Support, Lineage
Supports skills which Hit targets and have an area of effect, increasing the affected area and causing it to Hit Isolated targets harder.
, Efficiency II — your main mapping skill; the wave-into-shockwave chain is what covers the wide arc in front of you.
-
Earthshatter
Earthshatter
Attack
Slam the ground, sending out a fissure that deals area damage to enemies it passes under and thrusts a spike from the ground when it ends. Warcries performed near the spike will cause it to shatter, damaging surrounding enemies.
SlamWhile Dual Wielding, both weapons hit with 30% less Attack Speed
Deals damage along the fissure’s path and in a 1 metre radius around the emerging spike
Spike duration is 6 seconds
Limit 6 Spikes
Additional Effects From Quality:(0–6)% more Damage with Hits for each Spike
(0–20)% chance to cause an additional AftershockExplosion—Attack Damage: (140–507)%
While Dual Wielding, both weapons hit with 30% less Attack Speed
Explosion radius is 2 metres
Branching Fissures II,  Aftershock II, Rapid Attacks II, Verglas, Efficiency II — your bossing skill; once total Aftershock chance clears 100%, every spike it drops detonates on its own the moment it lands, no Warcry required to set it off.
🔗 5. Credits & Build Planner
Where this Sunder Earthshatter build came from, and where to see it in action.
- Build Creator: 대길이겨란-게임채널
- 대길이겨란 YouTube Channel: 대길이겨란-게임채널
- Current Character (poe.ninja): Level 98 Gemling Legionnaire – Path of Exile 2 – poe.ninja
💬 6. Author’s Notes
- Investment & Time Cost: No new uniques beyond the shared Part 1 gear — just re-craft the Aftershock chance onto the mace and pick up a second Melee-skill-level Gloves/Amulet pair.
- In-Game Performance: Surprisingly fast mapping for a Slam skill thanks to Sunder’s wave-shockwave chain, with Earthshatter and the guaranteed Aftershock covering bossing.
- Survivability & Room to Upgrade: Same Giant’s Blood + Shield defense layer as the Molten Blast variant — nothing new to budget for here.
This Sunder Earthshatter build guide is based on personal testing and setup of the character, closely following the build showcased by 대길이겨란-게임채널 and referencing his character profile on poe.ninja.
Pingback: PoE2 Gemling Legionnaire Build Guide: Ultimate All-in-One BD