📌 1. Build Overview & Mechanics
This is Part 1 of a 5-part series based on a build from Korean streamer 대길이겨란 (Daegiligyeoran)’s Game Channel. Instead of a single weapon and a single skill, he built one shared foundation on the Gemling Legionnaire ascendancy — passive tree, jewels, defenses, and almost all of the gear — that stays completely identical no matter what’s in your weapon slot. Swap the weapon, swap one or two skill gems, adjust a small handful of passive points, and you get four genuinely different playstyles out of the same character. He calls it the “All-in-One Build.”
This post covers everything that’s shared across all four variants. Parts 2 through 5 (linked at the bottom) each cover one specific weapon and only the handful of things that change.
- Ascendancy: Gemling Legionnaire. The build leans on the ascendancy’s ability to keep skills and support gems from a second weapon set active at the same time (via the current weapon-set-swap interaction), which is what lets the same core setup migrate between Mace, Bow, and Talisman with almost no changes. The trick has two named pieces: your main weapon set needs one Saqawal’s Rune of the Sky socketed (this is what “unlocks” the second set), and the second weapon set carries an Adonia’s Ego Siphoning Wand, which grants Level 15 Pinnacle of Power and Level 4 Power Siphon on its own — that’s why Pinnacle of Power runs “for free” off the off-hand set. Adonia’s Ego also carries “-10% to all Elemental Resistances per Power Charge,” which is the real reason the build needs a dedicated Purity aura running at all times.
- Skill Gem Quality scaling: the Gemling Legionnaire notable Advanced Thaumaturgy makes Quality on socketed Skill Gems grant each skill an additional, skill-type-specific bonus effect on top of what the gem already shows — separate from the “Additional Effects From Quality” lines every gem displays at base. This build pushes Skill Gem Quality hard for exactly that reason: both Arctic Armour’s per-Stage Armour bonus and Scavenged Plating’s per-stack Armour bonus (base 4%, pushed to 6% here) scale directly from that raw Quality, and Advanced Thaumaturgy stacks a further bonus on top of all of it. Worth flagging: the Gemling tree also has a similarly named notable, Crystalline Potential, which works differently — it just flatly increases gem Quality% rather than granting an extra effect. Don’t confuse the two if you’re pathing this yourself.
- Core defense — flat Armour stacking: the build wears a Mageblood belt, whose passive Mage’s Legacy buffs are drawn from a pool of named PoE1 flask effects — including a Granite legacy (+2,000 to Armour) and a Jade legacy (+2,000 to Evasion Rating). Mageblood only applies a given Legacy buff’s own bonus once even if it rolls twice, but each duplicate instead grants a stacking 25–50% increased effect to all of your Legacy buffs — which is how this build pushes both the Granite and Jade values up to roughly 3,000 each. Taking the Iron Reflexes keystone (“Converts all Evasion Rating to Armour”) turns that boosted Jade Evasion into pure Armour too, so the belt alone is worth roughly +6,000 flat Armour before anything else is equipped.
- On top of that flat base, investing heavily in Quality on a single body armour piece adds a large percentage increase to total Armour. In the video, the streamer removes every other piece of armour and still shows 90%+ physical damage reduction with over 30,000 effective Armour.
- Important caveat on the “90%” number: he specifically pushes back on the common advice that “hitting 90% mitigation is enough” — that percentage is only an estimate against a fixed hit size and decays as incoming hits get bigger. He treats the actual flat Armour number, not the displayed percentage, as the real target, and pushes it as high as possible.
- How far the Armour number actually climbs: starting from ~31,000 flat Armour (the point where the displayed mitigation estimate reads 90%), the Spirit skill Charge Regulation adds up to (15–20)% more Armour, Evasion and Energy Shield while an Endurance Charge is up. Stack that with Scavenged Plating’s per-stack Armour bonus (6% per stack at 10 stacks, thanks to the Quality scaling above), and the streamer shows the final number landing around 86,000 flat Armour on screen — nearly 3x the point where the game already called it “90%.” (The video doesn’t show the exact step-by-step math between these two numbers, so treat the 31,000 and 86,000 figures as the confirmed endpoints and the path between them as illustrative.)
- Damage loop: Herald of Ice triggers an Armour Explosion effect whenever it breaks an enemy’s Armour, which re-triggers Herald of Ice, which breaks Armour again — the effect chains across an entire pack until the screen clears. The very first Armour Break that kicks off the chain on a pack comes from the Rite of Passage Golden Charm: on killing a Rare or Unique enemy it randomly grants one of nine “Possessed by Spirit of the [Animal]” buffs, and when it rolls Wolf you get 50% chance to Maim on Attack Hit, 30% increased Skill Speed, 15% increased Movement Speed, and — the important part — Break Armour equal to 10% of Hit Damage dealt, which is exactly what seeds the whole chain above. Note that the charm’s base tooltip alone doesn’t show this — the Armour Break only shows up on the Wolf roll, one of nine possible animal spirits, so don’t rule the charm out just from its baseline description.
- Keeping Berserk’s Rage topped up: the reservation skill Eternal Rage is what keeps Rage from ever draining out, including across the weapon-set swap itself — its “Must be active in both Weapon Sets” line is why it has to be reserved on both sets rather than just one, and it’s the reason Berserk can stay permanently active through the whole trick instead of dropping every time you swap.
- Life model: this build runs Chaos Inoculation, keeping you at 1 Max Life, so the Life loss from the Berserk Spirit skill is a non-issue — a single low-tier “Life Regeneration per second” line anywhere on your gear fully offsets it.
- Optional block-chance layer: if you have Spirit to spare, Magma Barrier alone pushes Block Chance to around 70% with zero passive investment — a small handful of passive points takes it to 85%, and the Magma Spray payoff itself hits hard enough (170–694% Attack Damage, scaling off both your Shield’s Armour and Evasion) that it’s a real damage source, not just a defensive freebie.
- Passive tree: almost entirely fixed across all four variants. Only a small number of points move between Melee-focused and Projectile-focused nodes, plus whichever notable a specific weapon needs (e.g. Giant’s Blood for one-handing a two-handed Mace) — every keystone stays the same.
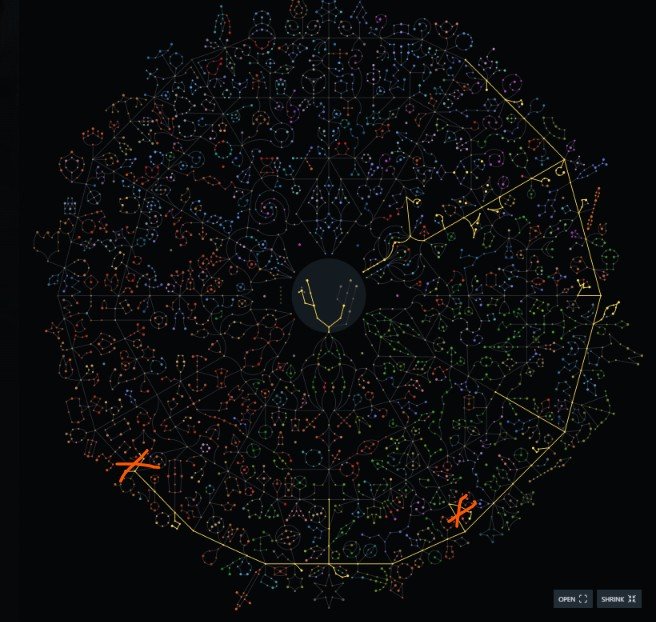
The two spots marked with an orange X (bottom-left and bottom-right) are not part of the shared core — those are exactly the Melee/Projectile swap points mentioned above, so which nodes you take there depends on which weapon variant you’re running.
📊 2. Pros & Cons
Pros:
- Extremely tanky — tens of thousands of flat Armour and a mitigation curve that holds up even against big hits, because this Gemling Legionnaire build stacks flat Armour instead of chasing the 90% percentage number alone.
- One build, four playstyles — the same passive tree, the same jewels, and roughly 90% of the same gear carry across two Mace setups, a Bow setup, and a Talisman/Wyvern setup. Switching styles is a weapon-and-skill-gem swap, not a re-gear.
- Stream-verified — the creator states all four variants were tested live with viewers watching, including against endgame pinnacle-boss content.
- Budget-friendly for what it does — because almost everything is shared, you build one full set of gear once and unlock all four playstyles, instead of gearing four separate characters.
Cons:
- Relies on a weapon-set-swap interaction that isn’t intended behavior — this is the kind of thing that tends to get hotfixed, so treat it as a strong 0.5.4 build to enjoy now rather than a guaranteed long-term setup.
- Fiddly to assemble — the double off-hand weapon-set trick and the specific jewel radius crafts take real effort to put together correctly the first time, even though nothing needs to change once it’s built.
🎒 3. Gear & Gem Setup (Shared Across All Four Builds)
Everything below stays exactly the same across this Gemling Legionnaire build in Parts 2–5. Only the weapon, one or two skill gems, and a few passive points change per variant. Hover any colored skill or Lineage support gem name for its tooltip card (tap on mobile); plain support gem names next to an icon are normal supports and don’t get a card.
Shared Skills & Support Gems
- Pinnacle of Power — granted for free by Adonia’s Ego Siphoning Wand (30% Quality, needs an open Augment Socket, with a Saqawal’s Rune of the Sky in that socket) on the secondary weapon set, run via the weapon-set-swap interaction. Adonia’s Ego also grants Power Siphon and carries “-10% to all Elemental Resistances per Power Charge,” which is the whole reason the Purity aura below is mandatory, not optional. Supports: Perpetual Charge, Heightened Charges, Efficiency II, Prolonged Duration II
- A second, separate Shrine Sceptre in the other hand of that same secondary weapon set (the same item type as Sacred Flame) — Level 20 Purity gem, 30 Quality, 1 socket is enough and the rest of its rolls don’t matter. Pick whichever elemental Purity covers your weakest resistance: Purity of Fire / Purity of Ice / Purity of Lightning. Supports: Strong Hearted, Warm Blooded, Clarity II, Cool Headed, Seraph’s Heart — this combination is also what locks in Ignite/Freeze/Shock immunity.
- Scavenged Plating — Supports: Prolonged Duration II, Physical Mastery
- Arctic Armour — Supports: Cold Mastery, Dialla’s Desire, Uhtred’s Augury
- Herald of Ice — Supports: Magnified Area II, Uruk’s Smelting, Armour Explosion, Increased Armour Break III, Living Lightning II. Living Lightning is included specifically to strip “Melee-only” tags off certain rare monster mods — it summons a melee-attacking minion that forces that mod off before your own hits land.
- Remnants of Kalguur (sustain) — Supports: Harmonic Remnants II, Remnant Potency III
- Berserk — Supports: Armour Demolisher II, Uhtred’s Omen
- Cast on Elemental Ailment — with a plain, no-Quality level-7 Profane Ritual gem socketed in — keep the gem level as low as possible and skip quality entirely, since higher quality only extends its duration and slows down your Power Charge income.
- Frost Wall (baseline/filler config here — Part 5’s Talisman build re-supports this same skill differently, covered there) — Supports: Glacier II, Charge Profusion, Boundless Energy II
- 4 low-level Intelligence-tagged filler skill gems, socketed purely to stack the “motes” resource from the Gemling ascendancy notable that rewards holding extra skills. The extra sockets come from a Talisman-base necklace whose innate granted skill is Eternal Rage (the same Rage-sustain skill covered above, under Life model) — plus two socket-less rings. Support these filler gems with as much blue (Intelligence) as possible — beyond covering Mana cost, the exact supports barely matter, except that a large Intelligence majority is also what grants innate Chill/Freeze immunity through the Gemling’s colour-imbalance interaction.
Shared Gear
- Helmet: Armour, Armour/Evasion, or pure Evasion base — it all becomes Armour anyway. Most important affix: “% increased Armour also applies to Elemental damage.” Fill remaining resists. A corrupted “+1(2) max Power Charge” roll is a nice-to-have, not mandatory.
- Body Armour: The Brass Dome Champion Cuirass (Runeforged base — the Champion-line chest with the most rune sockets). Prioritize the highest rune-socket count and an “Elemental resistance -1” corrupted implicit if you can find one.
- Rings: elemental (Fire/Cold/Lightning) hit damage — avoid Physical damage, since Pinnacle of Power’s amplification only affects Elemental damage. Fill remaining resists / attack speed. A “1% Life Regeneration per second” line needs to land somewhere on your gear (any slot) to offset Berserk’s Life drain.
- Boots: Armour/Evasion base, ideally with runes or high flat defenses.
- Belt: Mageblood with a Granite legacy + a Jade legacy as the two mandatory Mage’s Legacy buffs. The remaining slots are flexible — Quicksilver (movement speed), Bismuth (resistances, cheaper overall gearing), or another duplicate of Granite or Jade for an even bigger increased-effect multiplier on the whole belt. Set this item up first — it decides how much resistance the rest of your gear needs to cover.
- Amulet: craft-fractured with Spirit locked into the prefix (fracturing Spirit first is what lets you safely reroll the item), then crafted so the other prefix guarantees Max Runic Ward (easy to mix up with Max Power Charges when reading the stream — this build needs Runic Ward). Two more fixed, non-negotiable lines: all Melee (or Projectile) Skill Level, and Quality of all Skills. Keep one melee-skill-level copy and one projectile-skill-level copy, since gloves and amulet are the two slots that change type between variants. Budget tip: Max Runic Ward is craft-only and won’t show up in a trade search for it directly — search with Spirit fractured to the prefix instead, buy a copy with junk defensive rolls in the other prefix slot, then Chaos-spam with a prefix-only Omen to reroll into Max Runic Ward for cheap.
- Idol: Idol of the Pharisee.
- Gloves: two sets — a melee-skill-level pair and a projectile-skill-level pair, each with a jewel socket carrying the same shared combat jewel (below). “% increased Armour also applies to Elemental damage” is valuable here too if you can fit it.
- Flasks: a Mana flask (any) — Life flask is irrelevant since this is a 1-life build.
- Runes & Idol: Legacy of Greymake in the helmet’s Augment Socket (+50 to all Attributes). With Strength, Intelligence, and Dexterity Spirit skills all running at once, keeping your attribute totals balanced across all three gets tight without it — especially on the Mace variants, where Giant’s Blood eats a large chunk of Strength. Body armour: a rune for +20% increased Runic Ward in one rune slot, plus a Fox Idol socketed into its Augment Socket for a further +5% to Quality of all Skills (Fox Idol’s other Bonded effect — Minions have 30% increased Area of Effect — only applies if it’s socketed into a Sceptre instead; it does nothing extra on Body Armour beyond the Quality line). Weapon: Saqawal’s Rune of the Sky is mandatory in one weapon (see Ascendancy above) — the rest of the weapon rune slots are flexible (skill speed, or a rune granting a 50% chance to gain a Power Charge).
Shared Jewels
- Against the Darkness (Time-Lost Diamond): a small radius is fine — like the Sapphire below, its value comes entirely from the “Notable Passive Skills in Radius also grant X” mechanic, not raw range. This unique rolls 2 random Jewel Modifiers from a restricted pool, so you’re fishing for two specific ones: most important is Notables in Radius granting Spirit — get the 12-Spirit roll specifically, since that’s the exact amount that lets every weapon variant’s Spirit skills fit together. Second line: Notables in Radius granting damage gained as extra Fire/Cold/Lightning (any single element works), though that roll gets noticeably pricier — a resistance, or max resistance, roll is a cheaper fallback for the second line if budget’s tight.
- Heart of the Well (Diamond) — priority order: Fire damage gained as extra first (Lightning or Cold as fallbacks), followed by Attack Speed, Critical Hit Chance or Critical Damage Bonus, and a Mana Recovery on Kill line (Nice-to-have).
- Megalomaniac (Unique Diamond jewel that randomly allocates 2–3 Notable Passives from your whole tree): needs one of Paragon / Lust for Power / Thaumaturgic Generator (priority: Paragon and Thaumaturgic Generator first, Lust for Power third).
- Voices Sapphire: a corrupted unique that allocates 2–4 Sinister Jewel sockets nearby. Into those sockets go small passive jewels with hybrid attack/projectile+melee mods — prefix: increased Attack Damage; suffixes: Attack Critical Hit Chance, Attack Critical Hit Damage Bonus, Attack Speed, increased Buff Effect.
- Split Personality Ruby: buy one with a Shadow starting-point option so it can path toward the Monk side of the tree.
- Time-Lost Sapphire: a small radius is fine here too — its value comes from the same “Notable Passive Skills in Radius also grant X” mechanic, not raw range, which is also why this jewel and the one above stay identical across all four weapon variants instead of needing a rebuild each time. Needs: Critical Hit Chance of Notables in Radius, Critical Hit Damage Bonus of Notables in Radius, Notable Skill Effect increase, Notable Skill Area of Effect increase. If you’re crafting it, dropping the radius restriction opens up one more affix slot — a Notables-in-Radius “increased Magnitude of Elemental Ailments you inflict” line here is worth grabbing, since it helps Cast on Elemental Ailment trigger more reliably.
- Controlled Metamorphosis Diamond: the key line is “Passives in Radius can be Allocated without being connected to your tree” — this is what lets each weapon-specific cluster attach to the same fixed passive core without rerouting the whole tree. Like Adonia’s Ego, it also carries its own Elemental Resistance penalty, which is another reason the dedicated Purity aura is non-negotiable.
🧭 Continue the Series
Same passives, same jewels, same 90% of the gear across this Gemling Legionnaire build — pick a weapon and keep going:
- Part 2 — Mace: Molten Blast + Ancestral Cry (ranged clear)
- Part 3 — Mace: Sunder + Earthshatter (melee clear & bossing)
- Part 4 — Bow: Stormcaller Arrow + Tornado Shot (screen-clear mapping)
- Part 5 — Talisman (Wyvern): Oil Barrage + Rend + Frost Wall (highest single-target ceiling)
Pingback: [PoE 2] 🔮 Oil Barrage + Frost Wall Talisman — Gemling Legionnaire Build Guide (Part 5/5, 0.5.4)
Pingback: Molten Blast Ancestral Cry Build Guide — Mace (0.5.4)
Pingback: About PoE2 Builds Vault: Proven Guides for 8 PoE2 Classes
Pingback: Disclaimer for PoE2 Builds Vault — Important Notice